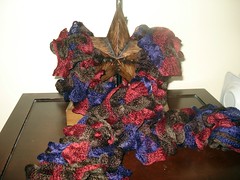
The first project is an actual, for real, FO. It's...a scarf. Or a boa. Or a scoa...or a

Pattern Name: Ruffly(Okay so I made that up)
Yarn: Knitting Fever's Flounce
Colorway: Not named, just Purple, Burgundy and Brown
Needles: Size US11
Over all, I'd say this was a fun, easy knit, once you get over the fiddly way this yarn (mesh?) is knit. Honestly it probably would have only taken me a few hours to work my way through this if I hadn't been so destracted by other shinies in my knitting bag!
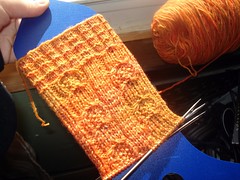
This next project is a WIP - but one that is actually actively in progress. :D

Pattern Name: Little pumpkins socks by Sabine Ruppert
Yarn: Knit Picks Stroll Tonal
Colorway: Foliage
Needles: Size US1 for the cuff Size US2 for the rest.
I really, really like this pattern. It is easy to memorize, but entertaining enough to keep you from being bored. Not to mention that this pattern screams at you to use orange yarn, and well, in my book, anything that wants to be orange is okay in my book!I'm actually almost done with the leg, because well, I like my socks a little shorter so I'm only doing three repeats of the chart in the leg rather than the four the pattern recommends. Also, if you are knitting this pattern for the first time, please do yourself a favor and read the notes on the pattern page in ravelry as she gives you the CORRECT way to do the cable row on the chart. If you don't, you will be looking at the chart in utter confusion, wondering how to get those two stitches back that you somehow lost on one side (don't ask me how I know this...just trust in me. Yessss...trust. in. me.Good pretties. *pet pet*)
So now that I've given you a mini yarn peep show, it's time to give you all a small recipe. Sadly, there is no food pron available for this, as all that I've made has been canned and gifted way before I even thought of picking up my camera. I know. I deserve spankings. But I also deserve warm bread...smothered in apple butter. Actually I happen to have some yummy, still warm from the oven sweet potato honey rolls that were most likely meant for this condiment and this condiment alone....huh. Food for thought. Anyway!
As requested by a few of my plurkies....(cue drum roll please)
as found on myrecipes.com
You need:
10 medium apples that have been peeled, cored and cut into chunks
1 cup packed dark brown sugar
1/2 cup honey
1/4 cup apple cider
1 tbsp ground cinnamon
1/4 tsp ground cloves,
1/4 tsp ground nutmeg
A sprinkling of allspice to taste (I probably used about...can ya guess? 1/4 tsp!)
Mix the sugar, spices, honey, and cider in the bottom of your crockpot until combined, throw in apples and toss to coat, cover and then put on low and just LEAVE it for about, oh, let's say 10 hours (or until your apples are very, very tender). Once the apples are nice and tender, get your good old fashioned potato masher out and give the apples a few good smashes. Trust me, this helps. Oh, and leave the crockpot on low, you want to keep the apple mixture nice and HOT while you're doing all this. Next, grab a large, fine mesh sieve and ladle apple mixture into it (over a bowl outside of the crockpot, silly) and start squishing it through all those little holes with a rubber spatula. You'll have pulp left over, but not much, just discard it all before you put more apples into the sieve and give the outside a good scrape down into the bowl of the good stuff. :D Continue in this fashion until all the apples and liquid have been pushed through. Then pour it back into your crockpot and turn that baby up to High (yes, we get to live a little!). Leave it uncovered, and let it bubble away, because we want all that "water" to evaporate so the butter can thicken. It needs to do this for at least an hour and a half. Butter is done, when it will either a) stay mounded in a spoon for a full minute, or when butter is drizzled in a line across the surface and keeps it's shape for a full minute before dissolving back in with the rest. The texture of this butter is relatively thin, even after all the evaporating, but it's okay. Leave it that way. Do not add pectin...do NOT be tempted by it. It will make your apple butter resemble something like apple cheese...or that oh so delicious (but THICK) cranberry sauce that's jelled and in a can and that you SLICE before serving.
Next up, you can spoon that hot butter in a bowl and chill in the fridge for up to a week, or you can actually gosh darn it all and can that stuff. This size batch will make a little over two pints, or 4 half pints. If you don't know how to can, it's really easy. Just buy your ball jars and lids, and wash 'em with good hot soapy water. Give 'em a good rinse. Then pop those jars in a big old pot of boiling water and let them boil for 15 minutes. Pop the lids into a separate pan of boiling water and let them boil for the same amount of time. Keep in the hot water so they stay heated when you use them. Pour piping hot butter into jars (I just ladelled it into a measuring cup and did it that way but you're supposed to use a canning funnel), then put on lids and tighten rings around them. Put them back into that big ole pot of boiling water to let 'em seal up and keep 'em boiling for ten minutes. Then take 'em out and you should be good to go. You'll know the jars are sealed when you hear a faint "boing". Now the butter should pretty much keep indefinitely canned in this way...buuut, it most likely won't last that long in your household so I doubt you'll have to worry about it. :D
Anyhow folks, I hope you enjoy, and happy crafting!


1 comment:
Oh sweetie, anyone who reads your blog can fathom exactly why I love you so much...
Post a Comment